F/?

Photograph of a Monitor Showing a Range of Apertures

Great Question:
I’m really confused on this part.. my camera only says f/4.0, f/5.6, and f/8

Answer:
Starting from the beginning, the aperture is an adjustable hole in your lens so that you can control how much light is coming in. Different lenses have different sized aperture openings.  As far as I know, no lens has all the numbers that are listed in the graphic. Some tend to be on the wider open part (f/1.4) while most don’t open this much. 

It sounds like your camera has three full f-stops on its lens.  This is good to know. The available range is a good one for most scenes.  It also means when you need to make adjustments to your exposure, you might need to use your shutter speed or ISO a bit more than others.  Not by much though, most lenses have a five stop range so yours is just a little shy of that.  No biggie.  😉  

Your lens, f/4 is wide open and f/8 is closed down. 

When you’re creating your exposures for the Sunny/16 rule (f/16 @ 1/ISO), you will start out with the following exposure on a bright, sunny day: ISO 100 f/8 @ 1/500 of a second

As you’re not able to close your lens down to f/16, you will close it down as much as you can to f/8. When you look at the aperture graphic you included in this email you can see that you were letting in 2 stops more light.

To correct for this, we need to quicken the shutter speed by 2 stops.  Normally, this shutter speed is 1/125th of a second with ISO 100.  To quicken it 2 stops we go from 1/125 to 1/250 continue to 1/500 of a second and stop.  1/500 will let in two stops less light than 1/125.

You can easily see with these adjustments, we are letting in the same amount of light to your camera’s  sensor.  In other words:

f/16 @ 1/125 = f/8 @ 1/500

You created two stops more lights by opening up your aperture and then brought the exposure down (darkened) by two stops by quickening your shutter.

Let me know if this makes sense or needs clarification. 🙂

Keep your questions coming,

Say

Multiple Submissions on Extra Credit Assignments

Great Question on Multiple Submissions on Extra Credit Assignments


Great Question:
Hi Say,
I was wondering if for the 2 extra credit assignments, if we upload at different times (with clicking “re-submit”), are you still able to see our previous submissions? Just wanted to make sure you are getting all of them.
Thank you !


Answer:

Thank you for your email.

Upload as many times as you like. I can see them all through a drop down menu for each upload date and time.

Take care,
Say

When I use Center of Interest Well, It Sounds Like I am Using Rule of Thirds. Is This True?

Great Question:
Hi Say,

I have read about both center of interest and rule of thirds and am a little confused between the two. I know for rule of thirds it is best to place the subject in one of the four intersections on the grid. However, center of interest also says that usually the subject is not placed right in the center, which kind of makes it rule of thirds, right? Are these two pretty much the same? If you could further explain to me the differences or similarity between the two that would be great!

Thanks


Answer:
Thanks for your question.

Center of interest just means having a strong subject or something of interest. Often, photos that have better eye movement throughout the photo when the subject is off center – like the rule of thirds. When you center something in the photo, it becomes more like a target and less like a subject in its environment. This means your viewer looks at only part of the photograph, not all of it. The idea of using composition well is to create eye movement from your viewer throughout your photo, not just the center of the photo.

We use ‘centering’ well when we want the subject to have a sense of isolation or the photo is of a product shot with a clean background…. or mugshots. In mugshots, the idea is to be able to identify a person and nothing else is important. When we photograph people in the center of the framing (school portraits is another example) it’s best to work to keep the eyes in the rule of thirds. Otherwise, try photographing your model off center (like the rule of thirds) and see how much more interesting your photos are to look at.

Keep in mind, composing a photo is all about experimentation. Sometimes when I photograph something I will bracket the composition. This means I will take the photo horizontal, vertical, using thirds, breaking thirds, move around to get a different angle. Often, my first photo is not the strongest. It’s when I start playing with the composition that I find I can create a more compelling photo.

In a nutshell, using more the one rule at a time to create a photo often creates a stronger photo that is more pleasing to the eye.  If this means that your subject (center of interest) is in the rule of thirds, then that is great!

Hope this helps,
Say

How Do I Work with BDE?

Great Question:
I also have a question about the basic exposure formula. I don’t really understand how I would set the exposures. Does the ISO determine the shutter speed and aperture setting? I’m not really sure how it works.


Answer:

Before I start in on BDE, let’s back up a step and answer your ISO question.  ISO settings tell your camera how sensitive to make your sensor.  If you have your camera set to ISO 100, then it is less sensitive to light and is best used in daylight or brightly lit areas that mimic daylight brightness.  When you double your ISO number, you make it twice as sensitive.  So 200 ISO is twice as sensitive as 100 ISO.  Imagine you are in a room where there are two lights with the same wattage right next to each other and both are turned on.  If you create a properly exposed photograph at 100 ISO, you could also get a same properly exposed result by turning one of the lights off and correcting only  your ISO to 200.  Because you made your sensor twice as sensitive to light, when you cut the light in half the photo will look the same.  Cool, eh?
This doubling of sensitivity is called a “stop”.  Continuing on from 100 ISO to 200, I would say that “my sensor is one stop more sensitive.”  If I doubled ISO 200 to 400, this is also considered “one stop more light” into the the camera.  (Technically, the same amount of light is going into the camera, but we photographers are not alway so technical in the way we speak.)  😉  Now a quick quiz for you…. If you changed your ISO from 100 to 400, how many more stops would you have increased you light into the camera?  Did you say two?  If so, give yourself a pat on the back.  Every time you double the ISO (100, 200, 400, 800, 1600) you are doubling the light sensitivity of the camera.  So, ISO 100 to 1600 is a change of four stops more light.  Got it?  Cool.
Now for something to pay attention to.  When you change your ISO from 100 to 1600 you are moving four stops, but this does not mean that you have “increased your light” by 4 times the amount of light.  Remember, you are doubling the each stop.  This means that you are creating the simple equation of 2 x 2 x 2 x 2 = 16 times more light.  (Ooooo, that is a good quiz question, don’tcha’ think?)  😉
We have been talking about doubling the light each stop and I have a feeling that you are starting to get your head around it so I am going to reverse the scenario for you.  Imagine that your ISO is set to 400 and you want to bring it down to 200.  What happens then?  Naturally, you half the amount of light.  So ISO 400 to 200 makes the sensor 1/2 as sensitive.  The halving of the half also goes into play when you move more than one stop.  How much less sensitive is 1600 ISO to 100?   If it helps, think like  you are using measuring cups.  You start with a full cup, go down to a 1/2 cup, then down to a 1/4 cup, then down to an 1/8 cup, and finally down to a 1/16 cup.  So when you change your ISO from 1600 down to 100 your sensor is 1/16th less sensitive.  This is like taking 16 lights of the same wattage and then turning them off until you are using one light.  That is a big change.
Whew, that was a lot of take in.  If you need to look up and take a breath before we move on, please do.  🙂  We are about to dive into BDE.
Ready?  OK, go get your camera if you want.  Sometimes it’s easier to understand what is going on if you dial in the changes.  If it gets to be too much, then just let it be a supporting friend next to you.  😉
BDE (basic daylight exposure) is pretty easy, but let’s start from the beginning.  In the real-world, BDE is known as the Sunny/16 rule.  Technically, BDE = ISO @ f/16 on a bright sunny day.  (This is another good quiz question.)  So on a full-sun day with no clouds nor haze blocking the sun’s light, your exposure when your camera is set to ISO 100 will be 1/100th of a second at f/16.  As we are working in full stops this term, we adjust the shutter speed to be 1/125th of a second.  (The tiny quickening of the exposure will not affect your exposure much.)  Essentially, on a bright sunny day, you will:
  1. Set your aperture to f/16
  2. Set your ISO to a number that feels good for you – usually 100 or 200 is better for full sun
  3. Then you will correct your shutter speed to match your ISO

Easy, right?

Now I know what you are thinking, “Yeah, that’s easy, but what do I do on a heavy overcast day?”  Another great question, thanks for asking.
On a cloudy day we have less light making it to the earth.  The clouds are blocking, absorbing, and reflecting some of the sun’s light and we just does not reach us.  This means we are going to have to adjust our exposure so that we are allowing for this lack of light.  We can make this adjustment one of three ways:
  1. Increasing the ISO – 100 to 800
  2. Opening up our aperture – f/16 to f/5.6
  3. Slowing down our shutter – 1/125 to 1/15 of a second

NOTE: You only need to change one of the tree options, not all three at the same time.  Making all three changes will give you a completely overexposed photo.  You don’t have to trust me, try it out outside.

Back to the lesson: I am betting you noticed that I have let in three stops more light with my exposure for each of these options.  How do I know to ‘open up’ the exposure by three stops?  I checked my handydandy BDE cheatsheet found here –  http://wfs.sbcc.edu/Departments/GDP/photo109/htm/befcheat.htm – and in our Resouces section of Week 2.  For heavy overcast days, it tells me  BEF + 3 Stops.  The “+ 3” is telling me to add 3 stops more light to my exposure from the BDE.  It is a good idea to have this cheatsheet with you when you photograph so feel free to print it out and stick it in your camera bag or photograph it with your phone and then mark it as a favorite so you can access it easily.
Please keep in mind that you do not have to change only one option above to get the correct exposure.  You can pick and choose what you want to change, but you only need to brighten your exposure by three stops.  You can increase your ISO by one stop and slow your shutter by two stops.  You can also adjust all three by one stop more light.  Let’s take a closer look at this.  First I am going to set up a full stop range of ISO, apertures, and shutter speeds so that you can refer to them as needed as I make exposure adjustments.
                 ISO: 100  200  400  800  1600  3200
         Aperture:  f/1  f/1.4   f/2   f/2.8   f/4    f/5.6   f/8      f/11     f/16     f/22      f/32      f/45
Shutter Speed:  1′   1/2    1/4   1/8   1/15   1/30  1/60  1/125  1/250  1/500  1/1000  1/2000  1/4000
Here all some examples of equivalent exposures:
ISO 100 f/16 @ 1/125  – This is BDE for a bright sunny day before the adjustments for heavy overcast
ISO 800 f/16 @ 1/125 – Increasing only the ISO by three stops
​ISO​ 100 f/5.6 @ 1/125 – Opening up only the aperture by three stops
ISO 100 f/16 @ 1/15 – Slowing down the shutter by three stops
ISO 200  f/8 @ 1/125 – Increasing the ISO by one stop and opening up the aperture by two stops
ISO 400 f/16 @ 1/60 – Increasing the ISO by two stops and slowing down the shutter by one stop
ISO 100 f/11 @ 1/30 – Opening up the aperture by one stop and slowing down the shutter by two stops
ISO 200 f/11 @ 1/60 – Increasing the ISO by one stop, opening the aperture by one stop, and slowing down the shutter by one stop

​We can keep going with the potential equivalents, but I can see your eyes are starting to glaze over from here.  🙂

OK, that was a lot of information.  If you need to go through it a couple times, please do.  Once you have this down, you understand the backbone of creating properly exposed photographs.  As photography is based on the speed of light, this will never change.  🙂
If you have any questions on any of this material, please let me know what they are.
Take care,
Say

What Are the Basics When Buying/Renting a Camera?

Great Question:
I am working on preparing everything for the class now. I called Sammy’s and they were very helpful. I will go there tomorrow to check out cameras. Thank you so much for that. One last question about the camera. Is there any additional gear that is mandatory to rent with a camera? Or, if I wanted to purchase one, are there any special lenses I need to be aware of getting as well, or is everything usually included?

Answer:

Yes, the guys/gals at Samy’s are great!  Be sure to let them know you are an SBCC student everytime you shop there for discounts.
With the camera rental/purchase you will need:
  • Camera
  • Lens – No special lens needed.  A basic zoom will work or if you are on a budget pick up a cheaper 50MM lens
  • Memory Card
  • Battery – If you can get two, that would be better
  • Battery Charger
  • Cable to connect the camera to your computer or a Memory Card Reader
  • Camera Strap – then be sure to use it  😉
  • Camera Bags are handy
  • Camera Manual – can usually be found online
  • Proper lens cleaning cloth is also good.  Don’t use your t-shirt if you use fabric softener.  The oils in the softener will eat up the lens coating that you paid for when renting/buying a lens
​I would imagine that the good people of Samy’s would have you set, but it’s good to double check.  We all have our off-days.
Thanks for asking,
Say​

Resizing in Lightroom and Photoshop

Great Question:
How do I go about trying to save my photo to make sure it meets the assignment requirements?   I used Lightroom CC but was unsuccessful and proceeded to try Photoshop and it worked on there to just save it in the format required for the assignment. If I need to clarify please let me know! Thank you for your time!


Answer:

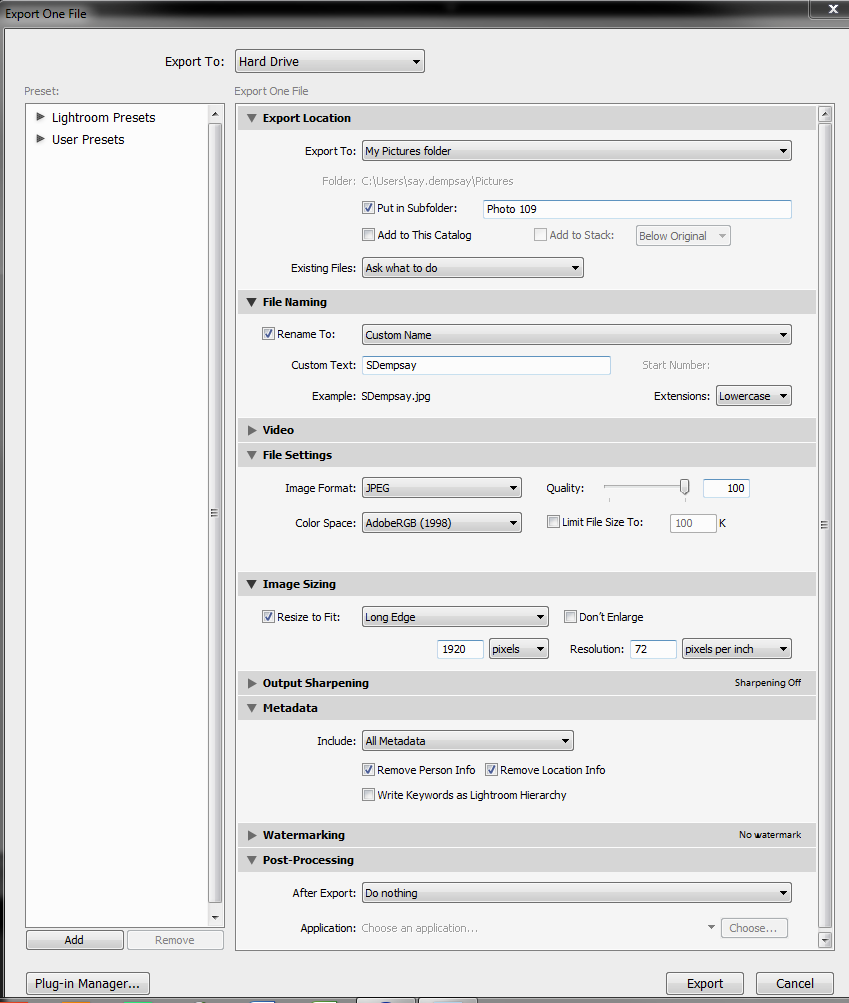
Quick Steps on Exporting Images in Lightroom:

  1. After you have imported and processed your photo(s), go the the Library module at the top right-ish corner of Lightroom
  2. Choose the photo(s) you want to export in the film strip at the bottom.  You may hold down the Command/Control key to select more than one photo
  3. Click the Export button at the lower left corner of Lightroom
  4. In the new window, work your way down
    1. Decide on your export location and if you want it in a sub folder
    2. Custom name the photo(s) to the assignment’s requirements
    3. Correct File Settings to:
      1. JPG
      2. AdobeRGB (1998)
      3. Quality is 80 or higher – the higher the number the better the quality but also larger files
    4. Resize to fit the Long Edge to 1920 pixels at 72 PPI
    5. Do not output sharpen
    6. Include All Metadata – but remove Person Info and Location Info if personal
    7. Do not watermark your photos for this class
  5. Click the Export button

Here is a sample of how the window should look.

Lr_Export

Quick Steps on Exporting Images in Photoshop:

After you have opened and processed your photos, you will want to resize them for submission.  When you resize in Photoshop, you are changing the actual size of the original image if you save it under the same name.  As we are sizing down, this means that your 1920 long images would not be good to print any bigger than a couple of inches in finished size.  To save your large files size, follow these steps.

  1. Process your large photo so that it looks like you want it to
  2. Save your large photo
  3. Go to File Save As and save your large photo again with the assignment requirement name
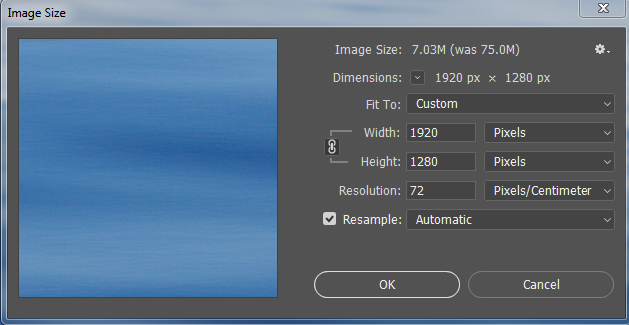
  4. Resize your photo by going to Image > Image Size in the top menu
  5. Change the Resolution to 72 PPI first
  6. Correct the longest side to 1920 pixels
    Ps_Resize
  7. Click the OK button
  8. Go to File Save As and save your now smaller photo as a JPG from the drop-down menu

Now all you will need to do is log into Canvas, go to the assignment, and click on the Submit button at the top right of the assignment to upload it.  Please remember to include your exposure notes in the Comments area of the upload.


How Do I Resize Photos in Apple’s Photo App?

Great Question:
The only app I have on my computer is the “Photos”.  I don’t have any apps that will allow me to size and save images. Would that app work or are there other apps you would recommend?


Answer:

Hi,
You should be able to file size in Photos.  Here are the steps you can follow:
  1. Highlight the photo(s) you want to export
  2. Go to File > Export > Export [#} Photos
  3. In the new window, click the downward facing carrot to the far right of Photo Kind
  4. Then in the expanded window, fill out your selections as below (You won’t be able to choose 72 PPI, but that will be OK.)Apple's Photos File Sizing Window
  5. ​Click the Export button
Let me know if this does not make sense.
Otherwise, you can download, install, and use GIMP (Links to an external site.) for free.
Hope this helps,
Say

Lightroom Export and Exposure Data

Question:

Hello I was emailing you to discuss our first assignment. I had a little trouble with it and would like some help if possible. After taking my photo I uploaded it to Lightroom and then exported it. When I exported it I went to change the dimensions of the photo. The 72 PPI was easy to set but the 1920 pixels was a little tricky. I saved it with the length and width each set at 1920 pixels yet it said something completely different when looking at it through my saved folder. I then went and clicked on long edge and entered 1920 pixels at 72 PPI and exported it and that is what I turned in but I guess it did not save that way. How would I do it? I have to admit I totally spaced on adding in the exposure information on the photo. But where would I find the aperture, shutter speed and ISO setting for the image? Just so I know where to find it for next time. Thank you -Rachael Waters

Answer:

Hello:
As you have submitted your work in on time, you have the option of making corrections and resubmitting. I don’t want to punish anyone for learning. I would rather that you know how to get it right. 🙂

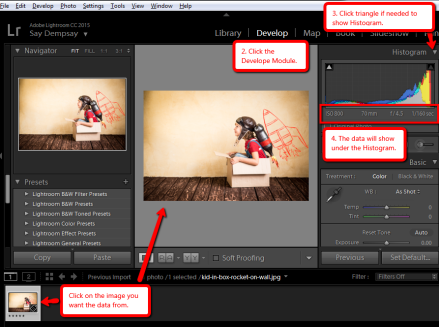
Sometimes it is easier to show what needs to be done than tell.  Here are a few visuals to help with how to accomplish what you want.

Saving an image in Lightroom
exporting images in Lightroom steps

Using the Library Module to find the exposure information
lr-exposure-data-library-module.png


Using the Library Module to find the exposure information
lr-exposure-data-develop-module.png

Hope this is helpful,
Say

Finding Due Dates in Canvas Quickly

Hello:
An easy way to find out what is due when, is to go into Assignments in the left-hand navigation tool.
Inline image 1
Once you are in the assignment area, you can create a find (Cmd+f or Ctrl+f) in the web browser you are in.  Then type in ‘Due ” plus the first three letters for the month and one or two digit numbers for the day you want to know which assignments are due.
Inline image 2
Remember, Canvas separates the discussion board post and exams from the assignments.  If you scroll down, you will see all topic listed quickly.

How do I know which image is my original when I make a virtual copy?

Question:
If I make a virtual copy, how do I know which is the original and which one is the virtual copy?

Answer:
This is a great question. Of the stack, the first one is always your original. The ones after that will say they are copies in the file name just above the filmstrip. Here is a video to help show you what I am talking about. http://screencast.com/t/5JY3oQaX6ki