What Are the Basics When Buying/Renting a Camera?

Great Question:
I am working on preparing everything for the class now. I called Sammy’s and they were very helpful. I will go there tomorrow to check out cameras. Thank you so much for that. One last question about the camera. Is there any additional gear that is mandatory to rent with a camera? Or, if I wanted to purchase one, are there any special lenses I need to be aware of getting as well, or is everything usually included?

Answer:

Yes, the guys/gals at Samy’s are great!  Be sure to let them know you are an SBCC student everytime you shop there for discounts.
With the camera rental/purchase you will need:
  • Camera
  • Lens – No special lens needed.  A basic zoom will work or if you are on a budget pick up a cheaper 50MM lens
  • Memory Card
  • Battery – If you can get two, that would be better
  • Battery Charger
  • Cable to connect the camera to your computer or a Memory Card Reader
  • Camera Strap – then be sure to use it  😉
  • Camera Bags are handy
  • Camera Manual – can usually be found online
  • Proper lens cleaning cloth is also good.  Don’t use your t-shirt if you use fabric softener.  The oils in the softener will eat up the lens coating that you paid for when renting/buying a lens
​I would imagine that the good people of Samy’s would have you set, but it’s good to double check.  We all have our off-days.
Thanks for asking,
Say​

Will I Get Noise in My Photos if I Crop?

Question:

If I have a 35mm lens with a 1.8-16 aperture and the camera has 42 megapixels, can I crop the picture in post to make it look like the 300 mm picture in the set below without “noise” so it’s in a high quality?

Thanks again,

lens-length-examples


Answer:

Noise is similar to static in a digital image.  It is where a pixel does not render the color correctly.  The grass is green, but the pixel will show it as gray or red or yellow…  Noise often shows when the camera’s ISO is set high to very high depending on the camera, the exposure is long (depending on the camera, think 30-seconds and longer), or the sensor is hot.  It’s best not let your camera sit in a hot car/trunk and then take it out to shoot.
When you crop in from a 35mm shot to create one that has the same narrow viewing angle as a 300mm lens, what is happening is that you are actually ‘stretching” the pixels so the final photo will show as blurry the more you crop into it.
To make the math easy, let’s say you started out with a 30mm lens and cropped into the image to be 300mm.  This is ten times bigger.  If your sensor is a full 35mm sensor size, this means you have 6000 pixels across and 4000 down.  Using the example photos you provided, let’s say the barn is 300 pixels across.  This means those 300 pixels need to be displayed across 3000 pixels.  Finer details are not picked up.  As much detail as you have at 300 pixels will show up 3000, no more.
If an image is cropped too much, it starts to fall apart and looks more like Minecraft.  We call this pixelization.  Also keep in mind that if you image does have noise, the noise gets ten times bigger too.
Of course the best way to tell how far you are comfortable with cropping into a photograph is to try it.  With enough practice you will quickly learn what looks good on a standard laptop to a  Retina display to HD to print on glossy and matte paper.  Naturally, images that are tack-sharp and exposed well have a better chance of displaying well.  Also, keep in mind that you can manually “zoom” in most cases with your feet.  😉
Hope this is helpful,
Say

Photo 109 Lecture 2 Math on Aperture Settings

Question:
Is anyone else having a hard time understanding the lecture 2 part about f/stop? I am reading it over and over and I just am not grasping the math (minimal as it is).

Answer:
Thanks for the question.  Let’s see what I can do to help clear up some confusion.

Starting from ground zero on the f/stops….

Your lens has a variable diaphragm in it that controls the amount of light it lets in.  This diaphragm is called an aperture.  When you have your camera in manual mode, you will control how large or small this hole is.

The gentleman that invented this aperture needed a way to consistently set the lens’ aperture so that they would know how much light is coming in.  They would turn a barrel on the outside of the lens that would have measured cuts in it to open or close the aperture.  The clicks would tell them to stop at this point for a per-measured setting.  This is why these measured settings are called f/stops.

Now, these guys were great thinkers, but did not want to do any math that was harder than necessary.  They got together and decided that each stop would either 1/2 the amount of light as the previous stop or double the amount of light as the previous stop – depending on which way they were turning the aperture.  With me so far?  If they had their aperture closed down (very little light coming in) and then opened it one stop, the film was now receiving twice the amount of light.

If they opened it another stop, the film would receive twice the amount of light as the previous stop and four times the amount of light as the original stop.

Remember, you have to keep doubling the amount of light.  So if they opened their lens up three stops they would receive the same amount of light as 2 x 2 x 2.  This would be eight times the amount of light than the original setting.


Of course the converse is true too.  If their lens was all the way open (more light comes in) and they closed down their lens one stop, 1/2 the amount of light would come in.  Close down two stops and ¼ the amount of light would come in. Three stops and 1/8th of the amount of light would come in than the original aperture setting.


Now it might seem to make sense that the f/stops would be labeled 1, 1/2, 1/4, 1/8, but we have to remember that these were smart men with exacting-ish standards. Instead, they decided to label each stop based on mathematics of the focal length of a lens and the diameter of the opening. Once they had their wide-open aperture value, they then took this value and multiplied it by the square root of 2 (1.41) to determine the next aperture setting. Yeah, I don’t want to go into that math either. It’s just easier to learn the f/stop scale.

1_1.4_2 _ 2.8 _ 4 _ 5.6 _ 8 _ 11 _ 16 _ 22 _ 32

You can note that if you take any of the numbers above and multiply them by 1.4 (and round as needed) you will get the next aperture number to the right. This is what the math in the lecture is trying to tell you. When you half the size of an aperture hole, you multiply it by 1.41.

Hope this helps. Let me know where more questions arise.

Say


What steps to you take to clean your lenses and sensor

As for cleaning lenses and sensors, you have to figure out what works best for you.  Watching Youtube videos is a great way to start.  I HIGHLY recommend watching at least five, but closer to ten or more GOOD Youtube or Vimeo videos on how people clean each piece of equipment.  You want something that works well for YOU.

Do keep in mind, you should never use cotton swabs or canned air to clean either.  Cotton swabs fall apart and leave lint on and in your gear.  Canned air has a propellant in it that will cause anything it touches to become sticky.  Over time the challenging sensor to clean will become impossible.

As for me, here are the highlights of what I do.  Do keep in mind that I do not apply a lot of pressure.  I use more repetition to get smudges or dust lifted.  (Note: the links listed are meant to only better show you what I am talking about.  You may like these or want to use something else.)

Lenses:

  1. Blow off the lens with a Rocket air blaster to knock off large dirt.
  2. Gently wipe the lens from the outer to the center with a clean microfiber cloth.
  3. I do not breathe on the glass.  Breathing on the glass can produce spit on the coating, plus it adds bacteria to your glass.  This bacteria can grow into something that eats at your non-glare coating.
  4. If a smudge will not lift, I do put some lens cleaning solution on my cloth and start wiping gently again from edge to center.
  5. I have used the Lens Pen to clean off fingerprints.  I do start with the brush end first and then carefully start by cleaning the outer edges of my lens and moving toward the center of the lens.

Sensor:

  1. I make sure my battery is fully charged and that I am not in a hurry at all.  Cleaning a sensor will take time.  I go in when I don’t have anything else to do and am not in a hurry at all.
  2. I clean my sensor in a clean bathroom.  I choose the bathroom because I run some water for a short while to bring the humidity level up a touch (NOT steamy) and thus help to bring down any dust.
  3. I set my sensor cleaning solution and sensor swabs (note: this link is to full-frame sensors, if you have a cropped frame, get the correctly sized swabs) so that they are ready to go and can be used with one hand.  I will use at least three sensor swabs.  These prepped swabs will lay on the side of the sensor box with the end that is going into my camera hanging off the edge of the box so that they are not touching any surface.
  4. Once I a ready, I will get the first sensor pad moist with the sensor cleaning solution.  Less moisture the better.
  5. I then put my camera in sensor cleaning mode under the Menu options.
  6. Keeping the camera body so that the opening is facing down, I take the lens off the camera.  I then inspect the lens to make sure it is clean and cover it with the proper cap.
  7. Next, I pick up my camera so that the hole is still facing down and then I take the moist swab and place it on one edge of my sensor.  I then gently swipe the swab from left to right.
  8. The camera is still facing down.  I am raising it above my head.
  9. When I reach the other side, I gently move the swab down the sensor edge without lifting it off and then gently swipe back.
  10. Again, I am not in a hurry.
  11. I do this until I think the sensor is sufficiently moist.
  12. I then place this moist swab down and pick up a new dry one.
  13. I then do the same edge-to-edge swipe and then move down on the edge to swipe back to the first edge.
  14. This is done until I see streaks.
  15. When this happens, I move to the next dry swab and repeat until the sensor no longer shows streaks.
  16. At this point, I put the clean lens back on the camera and retest it to make sure the dust is gone.
  17. If it is, then I go on with my life.
  18. Often it is not, so I repeat the process until the sensor is clean.

Here’s a video on how to take care of your camera by COOPH.

Do I need to clean my sensor or back element of my lens?

Question:
I can see some noise in my image, but my camera has an automatic sensor cleaner that cleans it on start up and shut down. Does that ‘only go so far’ or could this be smudges on my lens?

A blue sky showing four red circles that demonstrate where dust shows.


Answer:

Thank you for this work.

It looks like you completed this assignment pretty well and you have very little dust on your sensor!  That’s great!  What you circled is small dust, not noise.  Noise would spread differently on your sensor.  It is possible the dust is on the back element on your lens, http://photographylife.com/the-effect-of-dust-on-lens-bokeh.  My advice would be to make sure the back element is clean and reshoot the sky.  If the same dust shows up, then it is on your sensor.  Do know that the auto sensor cleaning are great, but not infallible.  They way they work is by shaking your camera’s sensor in an attempt to knock off the dust.  The dust that does fall, may land on a two sided sticky sheet of tape that runs along the side of the sensor.  It is possible for dust to stay on the sensor.

Your sensor is not too bad at this point.  You will want to watch this areas in images that has smooth surfaces.  When you do get to a point where you need to clean your sensor, be sure to do it in a manor that is safe for your camera.  As you know this will save you hours of time in the future from having to remove spots on your images and give you cleaner images to work with.  Stock houses do not accept images that have dust on them.  

If you do not already clean your sensor, please learn.  Watch at least five different videos on it.  You can also go to a pro camera store and have them teach you.  They will want to sell you some sensor cleaning stuff.  You want to buy it.  Do NOT use cotton swabs.  Do NOT use canned air – the propellant in it will cause your sensor cover to become sticky and make cleaning the sensor later MUCH harder to do.  

If you do not want to clean your sensor yourself, then go to a pro camera store and ask who in your area does the best job at cleaning sensors and have him/her do it.

A helpful suggestion is to place a reminder in your calendar to check your sensor again in six months time so that you can stay up to date with a clean, dust-free sensor.

How Do I Choose Which Lens to Buy?

Question:
I currently have a 18-55 mm lens, I wanted one that captured closer and sharp objects where the background is very blurry. I plan to use this lens for traveling. I see some of them are 18 to 200 mm but they don’t seem to be wide. I’m not sure how to put it in English!!

Answer:
Here is what I think you want – a versatile zoom lens that has a wide open aperture for shallow depth of field (also known as a fast lens).

Here is my advice based on the above:

  1. Buy the best lens you can afford – even if it means not drinking coffee or eating sweets for a month to afford it. Give up the coffee/sweets and get a lens you are only going to need to buy once. Good glass is critical for good images. Ideally, you buy the best lens and only change the camera bodies over time. If you can not buy the best at this time, then buy the best you can afford. 😉
  2. Buy a lens that offers vibration reduction when possible. This extra cost is worth it.
  3. If you have to give up something… I would say give up the 1.4 aperture for a 2.8 so that you can keep the range (18-200mm) and the VR.
  4. Test out your lens and find out which aperture is sharpest and how well you can safely handhold your camera at slower shutter speeds based on the length of your lens. You will want to do this when you lens is set to full zoom, medium zoom, and wide angle.
  5. Take care of your equipment.
    1. Get the correct lens cleaning supplies and use them correctly when you need to.
    2. Don’t travel with your lens on your camera body. This can stress out the connection on the camera and the lens. Instead, put the body cap on the camera and the lens caps on the lens(es) and travel.
    3. Use the lens shade that attaches to the front of the camera. It not only improves the look of the image in sunny situations, it adds an extra “bump” layer of protection.
    4. Do not use saliva on the front of your lens. Part of what you buy in a lens is the coating on the glass. Your spit can eat away at this coating.

FYI, cheaper lenses will not be as sharp over all, will have light fall off in the corners (dark corners), and will show more color shifting on the edges in the corners too. If you go with a cheaper lens, then you may want compose wide for important shots and fix later. What this means is that you place your subject closer to the center of the lens to keep it as sharp as possible with extra room on the sides. Then in post, you crop into your image so that your subject is place in a better compositional position for display. This of course brings down the file size of your final image, but your subject will be sharp and that is important.

Hope this helps,

Say!

What are some macro photography solution and how to clean a camera’s sensor.

Question:
Hi smile

I was doing quite a bit of research on macro realities this weekend and wanted to get your input. I really like doing macro work and eventually will get a really nice lens or two to do it. But the Sigma 105mm one I’d maybe get is about $1000. Such a bargain. smile  In the meantime the poor people are looking for less expensive alternatives. And along these lines I was looking at extension tubes and magnifying filters. I’m sure they’re not nearly as good.

When I was really into photography before I had a 55mm Micro Nikor lens which was pretty much an iconic lens with great optics. And I used it a lot. But now everything is so much more expensive. As with everything else I would imagine you get what you pay for.

Thanks for your input.

Answer:

Thank you for your questions.  Macro photography is quite fun and it is good to have a Plan B.
On thing that comes to my mind immediately is turning your lens around.  I mean pretty much just that.  This would be the steps.
  1. Get your tripod out and line up your shot – you can do this without a tripod, but it is easier with a tripod.
  2. Open your aperture to as wide as it can go.
  3. Correct your ISO and/or shutter speed so that you are properly exposing your shot.
  4. Take a shot
  5. Check the image and histogram
  6. Make corrections till it all looks good
  7. Take the lens of the camera’s body
  8. Rotate it 180 degrees so that the front of the lens in now making contact with the camera’s body. – Do this carefully
  9. The rear element of the lens is now facing your flower
  10. Check focus, adjust if needed
  11. Again, make sure the lens is being held next to the camera’s body
  12. Snap
  13. Check
  14. Adjust if needed
Note: Due to the amount of dust that floats through the air, you will want to try to do this in dust free place as possible.  If you are doing an out in the nature shot, then you stand a greater chance of getting dust on your sensor.
Please know that getting dust on your sensor is inevitable and part of the digital photographer’s life.  Before you clean it off, be sure to watch at least five videos on other people’s approaches to getting dust off their sensor.
As  you are going to need special tools to clean off the dust, I would also recommend going down to a local camera store and having someone there show you how to do it too.  Go early before they get busy.  You never want to clean the dust off sensors when in a hurry.  This is a slow, delicate, deliberate job.  😉
Also NEVER use canned air.  It has a propellent in it that will cause your sensor to get sticky and then trap more dust which will be harder to clean off in the future.  Also do not use cotton swabs as they will leave more threads than then pick up.  You want to buy the proper tools for the job and do it well.  We are thinking less pressure, more repetition.
  1. Often I like to run the shower in my CLEAN bathroom first to get all the dust in the room to settle.  The room should not be steamy though.
  2. Then I walk in with my sensor cleaning tools, the body cap to my camera, and camera body  with the lens on it and organize them for use.  (I also make sure there is no water on any surfaces and that the toilet lid is closed.)
  3. I then make sure my battery is well charged, and go to sensor cleaning in the menu of my camera to flip the mirror up and open the shutter so that I can safely reach my camera’s sensor.
  4. I then face the camera body with the lens down.  I carefully take off the lens and set it aside  in it’s cap on safe surface I will not bump.
  5. Next I clean the sensor in a way that is safe and works well for me.
  6. The clean body cap is put on the camera and next I go to work on the back element of the lens to make sure it is clean and perfect.
  7. Once this is done, I face the camera’s body back down (I do this step every time I change a lens too to lower the chances of dust getting into the camera and on the sensor), take of the lens cap, grab the lens and look at it one last time for dust, and then snap it into place on the camera’s body.
  8. I then click the remaining body cap to the lens end cap to keep dust out of them as much as possible too.
  9. To test my work, I take the camera outside on a cloudless day and point it toward the north (or south if I am in the Southern Hemisphere), close my lens down to f/22, and choose an ISO and shutter speed to so that my exposures are one stop underexposed.
  10. The last step is to look at this image  on my computer at 100% viewing to make sure there is no dust on the sensor.  If there is, I start over and repeat until there is not dust.
OK, enough on that.
Another suggestion would be to contact checkout@sbcc.edu and see if they have a macro lens that will fit your camera’s body that you can borrow.  If they do, you need to email me at least two days in advance to arrange permission to check out the lens.
As for the idea of extension tubes, these can really be pretty good.  Just be sure the one you rent, borrow, buy will work with your lens on your camera’s body.  Some lenses will not take extension tubes so be sure to research this too.
The magnifying filters are fun, but the least sharp all the way across.  They tend to loose focus as they work their way to the edges.  I did a cursory look online to see if I could find a good example of this, but did not find what I wanted.
Hope this helps!

I can’t seem to get my camera to focus correctly.

Question:

How did they get the back to be out of focus this is an aperture setting correct? I can’t seem to get my camera to do this!!

name_Rules_No_Rules_Leadinglines.jpg

Answer:

Hi,
I see an image name in  your email, but there is not image attached for me to see what is going one.  None-the-less, this information may help.
The aperture does not directly focus the photo, it only increases/decreases the amount of focus of an already focused photo.  One must have focus first.
Your lens may have a switch on it that says AF/MF.  AF = auto focus and MF = Manual focus.  If your camera is on AF then it will focus on something in the scene you are photographing.  Most cameras will have a small indicator inside the viewer that will show you what it is focusing on.
In MF, you must focus the lens.  There will be a collar on it or you may need to use the very end of it to turn and watch your image go in and out of focus.  If you are doing this and nothing is in focus, then you may need to turn  your diopter (https://sbccphoto.wordpress.com/2012/09/08/i-cant-see-anything-in-focus-when-i-look-through-my-viewfinder/) to correct vision that your viewfinder is set to.
If all this is set correctly and the images are still not sharp, then you may be getting motion blur.  This is where you are focusing on your subject correctly, but the shutter is open too long for you to hold the camera still during the time the shutter is open.  Many people begin to see motion blur at 1/60th of a second or longer.  This will depend on the lens they are using, how close they are to their subject, and how much caffein they have had prior.
If you would like to try reattaching your image, I will be happy to take a look at it.
Take care,
Say!

Why can’t I focus on things that are really close to my camera?

Question:

Hello Wendy! I’m trying to focus objects on manual focus but i’m having trouble with that. When i try to focus objects thr are really close to me on auto focus it doesn’t work, so i tried manual but i can’t get it to be focus either. Any tips for me?? Thank you!!!

Answer:

It sounds like you are trying to focus closer than you lens can do.  Lenses that focus very close are macro lenses.  Unless you have paid extra for this feature, your lens will not have it.  
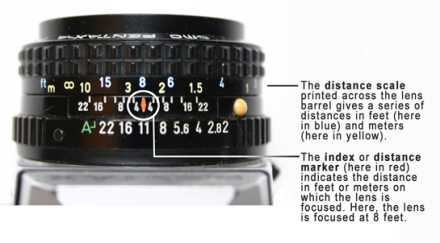
You can go online and look up how close the specific lens you have will focus.  Chances are that it is also marked on the barrel of your lens.  This image will help you determine what you are looking for.  
Focus scale in feet and meters on a lens.
From what we can see, this lens only will allow focus as close as three feet as indicated by the blue number on the far right side of the lens.
 
To work around this.  Back up from your subject until focus works again.  Shoot the frame you want and then crop the image in the computer to look the way you want it to look.
 
Take care,
 
Say!